Tuesday, April 8, 2008

PDA/GPS Install...

Well, I gave up on the idea of a sleek, custom install of my PDA/GPS combo. I was excited about the possibility of placing it within the center console--had it all figured out--but then a "test run" in my Legacy revealed that the angle of the PDA would provide one gnarly glare on the screen at most points during sunshine. So, I opted away from that and decided to rig something using the production PDA mount...the one every joe-schmo uses. So much for uniqueness. But, I did "custom" it a tad by mounting the PDA holder to the driver's side windshield pillar, running the power and an audio cords behind the dash, so that at least that provids a clean look.


From the box, the PDA mount has a little spring lever that provides constant tension for the suction cup that holds the thing to the windshield. I tapped the pin out of the lever and removed that whole suction cup assembly so I could mount it directly to the pillar trim, as you can see in the above pic.

I drilled a hole in the trim and used a nifty wall anchor to hold the PDA mount in place. I did have to hacksaw the length of the bolt, of course, to provide clearance once the pillar trim was snapped back into place. I thought this setup would be more secure with its distribution of weight, as opposed to just a nut screwed on the bolt.


Then I cut a notch at the botom outside corner of the pillar trim. This is to allow the power cord and the audio cord to be out of sight and out of the way except for the portions that are in the PDA. I already had the two cords sticking through the dash before I put the pillar trim back on.


And, here's the finished result. Not what you'd call "trick", but it looks better than having it hang from the windshield and with cords strewn over the dash. I do want to find a couple 90-degree elbow adapters for the two cords so it pulls them out of view a little more--especially that power cord on the bottom.


Roof: Part 2


Next, it was time to work onthe top of the roof. A dent or two isn't that bad to fix with Bondo. Time consuming, but not all that bad. This was more than a couple of dents. I took the roof down to bare metal so I could work on those dinged and dimpled and wavy spots up front.


Then, it was time for the Bondo. I put an initial base layer of filler over the affected areas. I sanded, then added a bit more where there were low spots. Sanded again, and then hit a couple of other obvious spots one time more.


Now, my approach to the roof was a little different than what other people would have done. Ideally, the whole front section would have been stripped down to metal and a larger area hit with a thin layer of Bondo, followed by a lot of sanding and smoothing and repeated process. However, my plan for the roof was different than a traditional smooth and paint to match job. I wanted to add a utility/off-road touch to the car by covering the roof with a tough, durable truck bed liner. Weird, I know. I haul mountain bikes a lot on the roof, and am constantly laying things on the roof, so I wanted to go this route. With the factory roof rack lines that were black and separated the roof from the rest of the car, I thought it might work. And, as a bonus, it would cover many of the small imperfections that would have taken hours and hours to work out. If not for the fact that I'm putting a bicycle carrier on the roof rack, I probably would not have gone this route. Hard to tell how it will look until the car is finished, with the complete rack setup installed.


Roof Work

Well, I think of all the damage to Green, the roof is probably the worst to have to work on. I don't know anything about the accident that got this car to the salvage auction, but the way the roof was damaged, I wonder if a deer or something was hit and then bounced off the roof. Regardless, there was some nasty denting that took place. A pro would have cut the top off the car and welded a clean one in its place. I'm not a pro (no welding skills whatsoever), and the project would have quickly left the "budget project" zone had I paid someone to cut and weld a new top on it.


So--the first issue to address was the couple of bigger dents in the roof. BURMP--just pop 'em out and the dents are gone, right? Nope. Once dented like that, the damage has a memory effect, and before you know it the dents would return to their inward status. So, I pushed out the dents, and then reinforced the roof by using the support beams from the parts Impreza.


I cut the beams into pieces that fit the strip that needed reinforced, then flattened the ends to help them fit into place between the roof beams in Project Green. Then, I wedged them in place and positioned them where needed. The first beam and the windshield support beam had been gapped a little from the roof structure, and there didn't seem to be a way to bring the two together. Besides, this method offered the strucural rigidity under the damaged area that I wanted.


I was rather pleased with the finished product. It has a LOT of strength/support, and I thinkI could sit on that portion of the roof and not worry about those dents falling back in.


Finally, I hit the beams that were cut and installed with a seam sealer. This should seal things together and be similar to the factory stuff that's squirted in there at assembly.


Friday, March 28, 2008

GPS Update...Change of Plans Needed

Well, I was excited about the console placement of the PDA/GPS unit, but while doing some around town experimentation, I discovered that a combination of the low placement and tilted angle of the PDA, a bad glare on bright days would pose a serious hindrance. So, I may be forced to use the included mounting arm/bracket. I’m going to look at the possibilities of modifying the actual PDA holder to mounting directly to the pillar. I want something that looks clean, and after I hook up power and audio cords, a regular holder to windshield install would look cluttered. Attached directly to the pillar, I can drill a simple hole in the plastic trim and conceal most of the wires.

That being said, I have been playing with the unit in my LSi wagon this week. I really like the setup. A maybe-cool thing about having the PDA located above the dash is that the PDA’s camera can shoot live video. Not sure when I’d need or want to shoot any driver’s-perspective video, but it’d be a possibility if I ever wanted to.

Sunday, March 23, 2008

Strip Club Fun...

If you own an Impreza, this is what they look like naked.


It's so much fun to take somethin apart when you know you don't have to put any of it back together. :-)

Cradle Robber...


The body man who is going to be pulling the front end stopped by the garage to look at Project Green for the first time. He said the job would be much much easier if he had a good radiator cradle to weld in after pulling the subframe. He's the guy who pulled the front on my '95 LSi wagon a few years ago and had mentioned to my dad this weekend that I must like Subarus. He commented with a grin to me that my Impreza OBS looks like an AMC Pacer. I won't hold it against him, though, because he's a nice guy who does great body work...and he's probably right.


He suggested we drill out the spot welds on the donor car and pull it off that subframe. So, Dad and I soon begn drilling away at he spot welds. Man, there were a bunch of them. It soon grew into a one-man job, and dad is the one who actually did he grunt work to pull this thing off.


Three Generations...


Here's my two helpers. Well, only one of the people in this pic actually does any productive work, but the other will be getting greasy soon enough...


New Windshield!!!!!


On Saturday, a glass guy came to the garage and installed a new windshield in Project Green. Now, it doesn't look nearly as much a disaster. I wish the pic truly showed how nice this new windshield looked. The tint at the top is much deeper and reaches down further--much nicer than the factory 'shield.


Hatch Swap!


Not a big deal, but I swapped hatches yesterday. I figured this would be easier than taking apat the two spoilers and changing them over. Plus, Project Green had a stupid dealership decal stuck to its gate, so now I won't have to remove that. Taking the hatch off the donor car wasn't very hard, and I was able to do so by myself. A helping hand made lining the bolt holes up a bit easier after I placed it at the new car.


Now, when you remove the hatches, you also must disconnect wiring harnesses on the passenger side and the washer fluid hose on the driver's side. They are not right at the top of th hatch, but rather deeper down in the car. The washer fluid hose will be black and will detach from a fitting that's on clear tubing that runs up the rest of the car.


And, here it is on Project Green:


(Don't forget to also switch over your lock if you ever do this...)


PDA/GPS Custom Install: PART ONE

Well, I received my PDA in the mail I'd won on eBay. Not so sure how I got lucky enough to snag this for $20, but I'm glad I got it. I was thinking on devising a method of mounting this thing in the headliner, kind of back from the reaview mirror some, but I think I've decided on a better place. Better as in easier for me to get it to work. :)
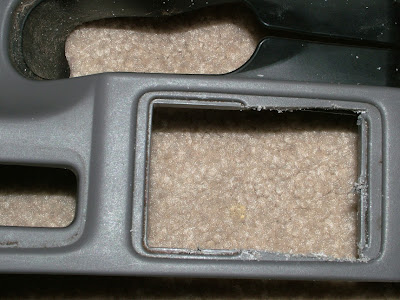
I removed two of the little coin holder inserts and the remote contol for the side mirrors from the center console. I should have just enough room to slide the PDA in behind a newly cut and smoothed opening right there. I plan to cut a slot on the driver's side of the console so I can slide the PDA in and out when needed. Yes, the cut is very rough--I'll clean it up and smooth it out after I make sure this can actually work. (This is off the donor car, so I still have my own console panel if it won't work.)


One thing I'm unsure of is if the Bluetooth will work on the PDA with it partially concealed within the center console. I haven't received the GPS sending unit yet, so I'll have to do a test run when that comes in. If not, I may have to resort to the dorky little flexible arm holder that every other joe has...

Wednesday, March 19, 2008

The No-Update Update...

OK--I haven't done a stinking thing to either car since the first post. The cars are in my dad's garage, and I live out of town, so I'll only be working on them when I get the chance to visit my folks. I have, however, been doing a little plotting and buying for the future. I had decided a bit back that I wanted to put an aftermarket GPS unit in the car; however, I didn't want to just stick it to the dash w/ velcro stickers or in one of those windshield arm holder things--I wanted to do a bit of a custom install to it. My first thought was the little pop-up storage unit on the top of the dash, but I couldn't decide exactly how to incorporate it in that thing and didn't like the idea of having to lift a lid to see it, as that would be dorky to drive w/ the lid popped open. Then I dropped the headliner and thought I might try to customize a pop down holder/bracket that I'd attach to the roof right there in the middle, at the windshield. I'll have to scavenge some junk yards to cadaver some things from other cars to use for this. I'll post something when I figure it out myself.

So, I started checking eBay for GPS units. Some are pretty basic and some do a little more. None were really all that cheap. Then, I saw a GPS upgrade for a Palm Pilot, and I just happen to own one of the two models it worked with. BINGO--new idea. I get a refurb Palm GPS package for $47. And, the cool part, I got lucky and won another PDA just like mine for $20! A Zire 72. Usually sells for triple and more. Now, I'm going to be able to make the PDA a permanent fixture to the car. With the PDA in the car I will be able to use it as an auto GPS device, I can play all my MP3 songs through the radio, I can control my cell phone via bluetooth through the PDA, I can play movies (very tiny movies of course) with the audio through the car's speakers, and all the usual PDA stuff like a calender and calculator and MS Office applications. I'm excited to get this installed and working and professional looking. Kind of like a little mini onboard computer for the car.

Of course, with the headliner removed from the car already (so I can work on that roof damage), I can run all the wires (power, audio) behind the headliner and behind the pillar trim for a super clean look. Now, I have to figure out what to do about the radio. It has the factory cassette deck radio, so I am going to have to do something to replace it so I an play CDs too. I might find a factory CD/cassette combo unit, or just get an aftermarket CD player that has line-in jacks to plug the PDA directly in w/o having to use the cassette adapter, which should produce a better sound for my MP3s.


While Project Green is at the frame shop (hopefully soon), I'll continue stripping the donor car. Hopefully, I can find another project car at a good price to rebuild using all these other parts. If not, I suppose I'll sell most of them and keep a few as spares.


Here's a short video shot of Project Green. Hopefully, on Sunday, I'll be able to post all kinds of progress...


Sunday, March 16, 2008

The Project Begins...

Back in January, I looked at a 1999 Subaru Impreza Outback Sport that I saw listed on a rebuildable wrecks web site. It was hit in the front and had only 71,000 miles on it. I have owned a '95 Legacy LSi wagon for about 5 years now and have had great luck with the car. It's pushing 230,000 miles now, and I was looking into replacing it with a lower mileage car as prevention. I also thought maybe the smaller Impreza would be a little better with gasoline consumption. I was hesitant about the smaller size, the lack of a sunroof, and the fact that I had been spoiled by the leather interior of my LSi wagon. and would have to get used to cloth again.


Anyway, I looked at this car, estimated the cost of gathering the needed parts, and decided I didn't want to risk investing too much into the project. I would have to buy a new hood, front bumper unit, headlight, windshield, and both airbags. A frame shop would have to pull the front, and then there was that nasty damage to the roof. I was afraid the costs would get out of control, so I passed. Then, a couple months later, the guy who had it for sale had picked up a 2000 Impreza wagon that was the same green color and had all the parts I needed. So, I shot him an offer, he took it, and the journey began. In addition to having all the parts I need for my fix, I also have additional parts, including a good engine/trans, that I can use for a different rebuild or can sell. So, that will lower my investment as well.


*****
Today, I received both my Subes. Since they are AWD cars, they needed to be flat hauled. It was a 55 mile one-way trip, and the cost of transport was more than I liked, but with diesel fuel up so high, I won't complain too much. Now they are both in the garage and the tear down of each has begun. Here's a bit of a look at the progress from day 1 with Project Green Machine.

Just into the garage:


The donor car rests beside Project Green Machine. Notice the spoilers on the hatch--obviously I'm swapping hatches:


The interior in my project car is pretty good for a 9 yr old car...with the exception of blown airbags and broken glass scattered within:


That roof is gonna be a challenge to fix:


.

.

.

.

.

.


.

.

.
.

And, by the end of day one, the front end was completely off my project car, along with the L fender and to roof rack. The L fender and front bumper assembly were swiped from the donor car, and the hood was swapped. Inside the car, the headliner has been removed to aide the work on the roof. Also, all the sticky residue from where the plastic had been taped to the car was rubbed out with some serious elbow grease. (Special thanks to Dad!):


.
.
.
.
.
We'll see how things progress from here. The next step is to have the frame shop set Green on the rack and straighten that front end out. Then, back home, I'll have to address the issues involved with the roof and then have the donor's windshield swapped into the project car. It was lucky to have a donor car of the same color, but, unfortunately, the stripe is a different shade, so I will have to do some painting. This was the first time the cars were sitting side by side, so up til now I was banking on no paint work other than the roof. That's minor, though. Less vital things to keep on the list are finding some sporty wheels for Green and swapping a CD player in for the factory tape deck. I'd also like to customize the install of an aftermarket GPS unit.
Until next time...
-JT